Greetings, dear readers of design-foto.ru! Today we will talk about a material that is experiencing a real revival and is becoming increasingly relevant in modern interior design. We are talking about wood paneling – an eco-friendly, beautiful, and versatile finishing material that can transform any space, giving it coziness and unique charm. If you are thinking about renovation or simply want to refresh your home, take a closer look at wood paneling. In this article, we will thoroughly analyze all aspects of its use, from choosing the material to the intricacies of installation, and show you how to create a truly stylish and functional interior with this seemingly simple material.
Wall Cladding with Wood Paneling: Why It’s Relevant for Your Home in 2024
In a world where more and more attention is paid to environmental friendliness, natural materials, and creating a cozy atmosphere, wood paneling is once again coming to the forefront. This finishing material, traditionally associated with saunas and country houses, is now demonstrating its amazing versatility and ability to fit into a wide variety of interior styles.
Why is wood paneling so relevant right now?
- Eco-friendliness: In an era of conscious consumption and health concerns, natural wood is one of the most preferred materials. Wood paneling, made from wood, is absolutely safe for health, does not release harmful substances, and creates a favorable microclimate in the room.
- Aesthetics and coziness: The texture of natural wood, its warm shades, and unique pattern can fill a home with special coziness and warmth. Wood paneling gives the interior nobility and natural beauty, making it more lively and harmonious.
- Versatility: Contrary to stereotypes, wood paneling looks great not only in rustic or Scandinavian interiors. Modern processing technologies and various types of profiles allow it to be used in loft, minimalist, modern classic, and even eclectic spaces.
- Practicality: Well-finished wood-paneled walls are durable, easy to care for, and have good thermal and sound insulation properties.
- Ability to hide imperfections: Wood paneling perfectly masks wall irregularities, plaster defects, or wiring, making it an ideal solution for quick and high-quality finishing without the need for complex surface preparation.
- Tactile sensations: Touching smooth, warm wood provides pleasant sensations, which also contributes to creating a comfortable atmosphere.
Wood paneling is not just a finishing material; it’s an opportunity to bring a piece of nature into your home, create an atmosphere of peace and harmony, and realize bold design ideas. It allows you to turn ordinary walls into a true work of art, emphasizing your individuality and taste.
Types of Wood Paneling: Which to Choose for Different Rooms – from Balcony to Living Room?
Choosing wood paneling is the first and perhaps the most important step towards creating the perfect interior. The variety of wood species, profile types, and processing quality can be confusing, but understanding the key differences will help you make the right decision.
By wood species, wood paneling can be divided into several main groups:
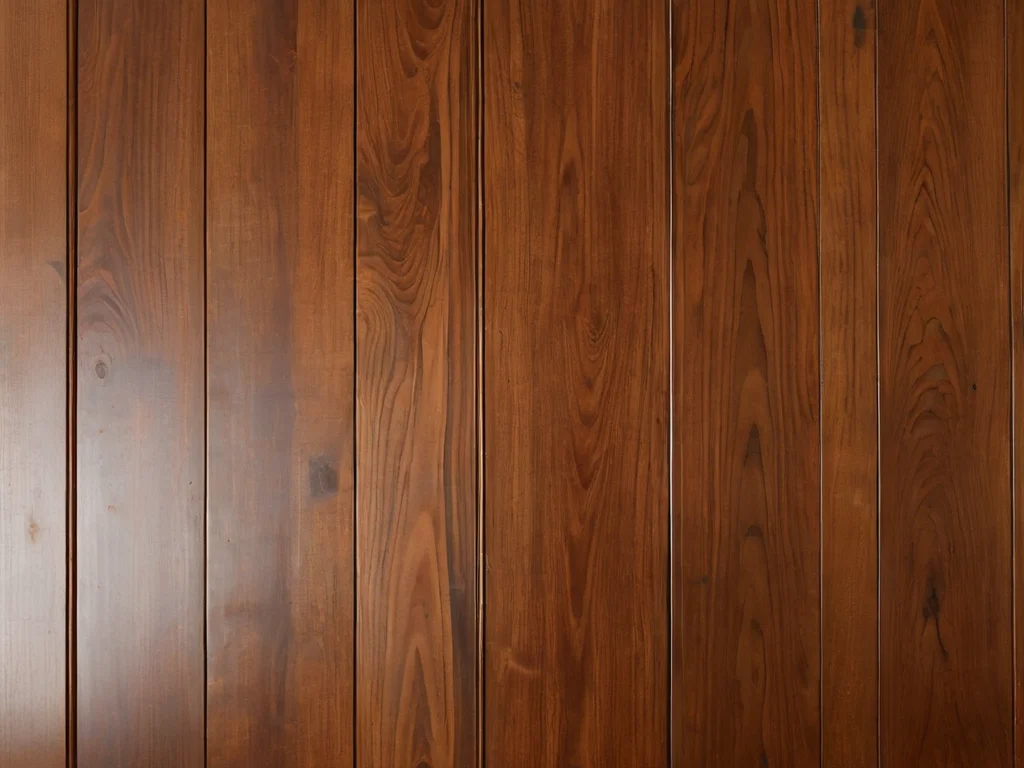
1. Coniferous species (pine, spruce, larch):
- Pine and spruce: These are perhaps the most popular and affordable options. The wood is soft, easy to work with, has a pleasant resinous aroma, and a beautiful pattern. Pine and spruce are excellent for finishing living rooms, bedrooms, children’s rooms, as well as balconies and loggias. However, due to their softness, they are more susceptible to mechanical damage and moisture absorption, so they require reliable protective treatment. It is important to choose well-dried wood to avoid deformation.
- Larch: This noble material is characterized by high density, strength, and resistance to moisture and rot. Thanks to its properties, larch is ideal for finishing rooms with high humidity, such as bathrooms, kitchens, hallways, as well as for exterior work. It has a beautiful, rich color and expressive texture. The main drawback is its higher cost compared to pine and spruce.
2. Deciduous species (alder, aspen, oak, ash, beech):
- Alder and aspen: These species are also resistant to moisture and not prone to rot, so they are often used for finishing baths and saunas. They have a smooth, pleasant-to-the-touch texture and do not release resin. Aspen is considered one of the most hygienic species.
- Oak, ash, beech: These are premium wood paneling options. The wood of these species is characterized by high strength, wear resistance, beautiful texture, and noble appearance. Oak or ash paneling will be a real decoration for a living room, study, or bedroom, giving the interior status and respectability. However, high cost and complexity of processing make it less accessible.
According to quality class, wood paneling is divided into several grades:
- Class “Extra” (or “AA”): Perfectly smooth surface, complete absence of knots, cracks, bluing, and other defects. The most expensive option, suitable for elite interiors.
- Class “A”: Healthy, non-falling light knots are allowed (no more than 2-3 per linear meter), slight color variations. Excellent value for money.
- Class “B”: Dark, falling knots, resin pockets, minor cracks may be present. Suitable for budget repairs, utility rooms, or if intensive painting or decorative treatment is planned.
- Class “C”: The lowest grade, allowing a large number of knots, cracks, resin pockets, bluing, warping. Used mainly for rough finishing or for rooms where appearance is not of primary importance.
By profile and connection type:
- Euro-paneling: Characterized by a deeper groove and tongue, which ensures a tight connection without gaps and prevents moisture ingress. It has neat chamfers on the edges, which give the wall a more aesthetic appearance and hide minor defects.
- Standard wood paneling (without euro profile): Simpler shape, shallower groove. The connection is less airtight, gaps are possible.
- Log house siding (Block-house): Imitates a round log. Walls finished with log house siding look like a wooden log house.
- Imitation of timber: Imitates timber. Creates the effect of wooden sheathing, but without the pronounced log house effect.
- American siding (formerly called “ship lap” siding): Planks have a special profile that, when installed, overlap each other, imitating the exterior sheathing of houses.
What to look for when choosing:
- Wood moisture content: Should not exceed 12-16%. Excessive moisture will lead to shrinkage and deformation.
- Absence of defects: Carefully inspect each board for cracks, bluing, mold, rot.
- Geometry: Boards should be straight, without visible curvature.
- Profile matching: Ensure the profile matches your expectations and installation type.
Choosing the right wood paneling is the key to ensuring that the finish will please you for many years, retaining its original appearance and functionality. Do not skimp on quality, especially when it comes to living spaces.
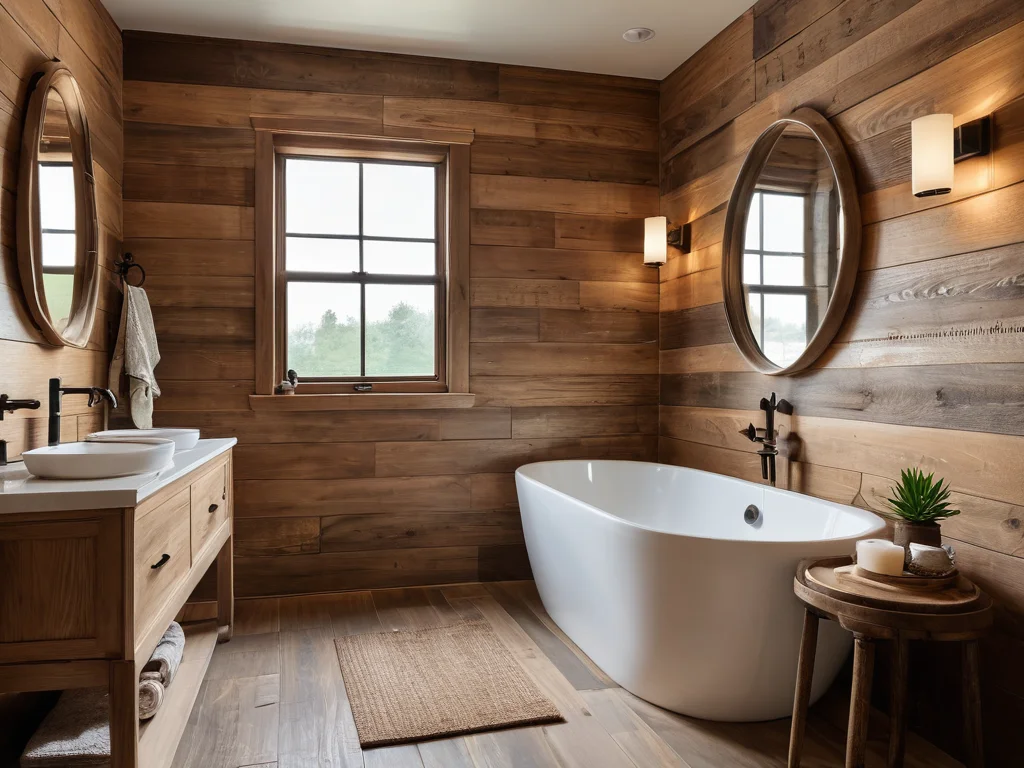
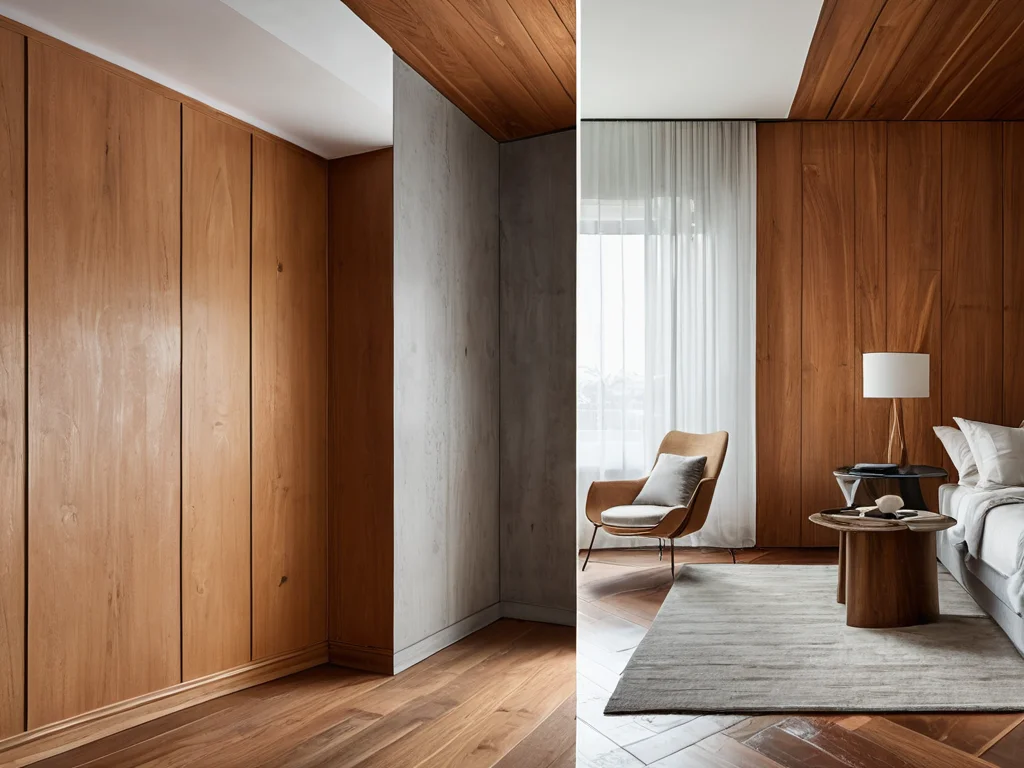
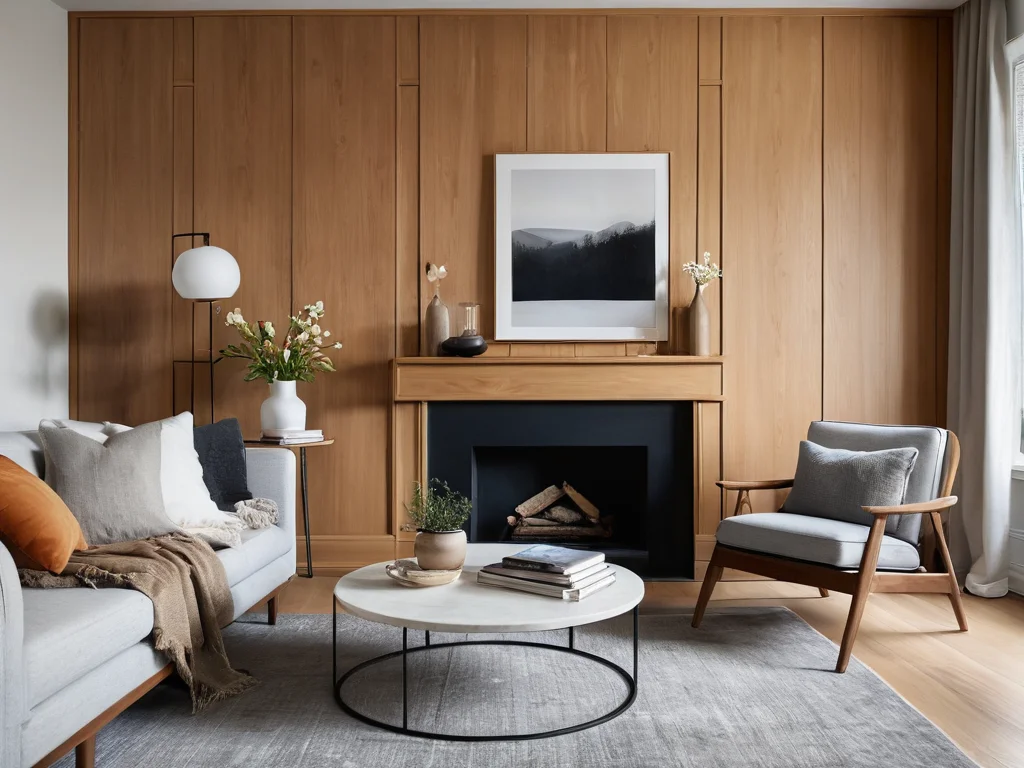
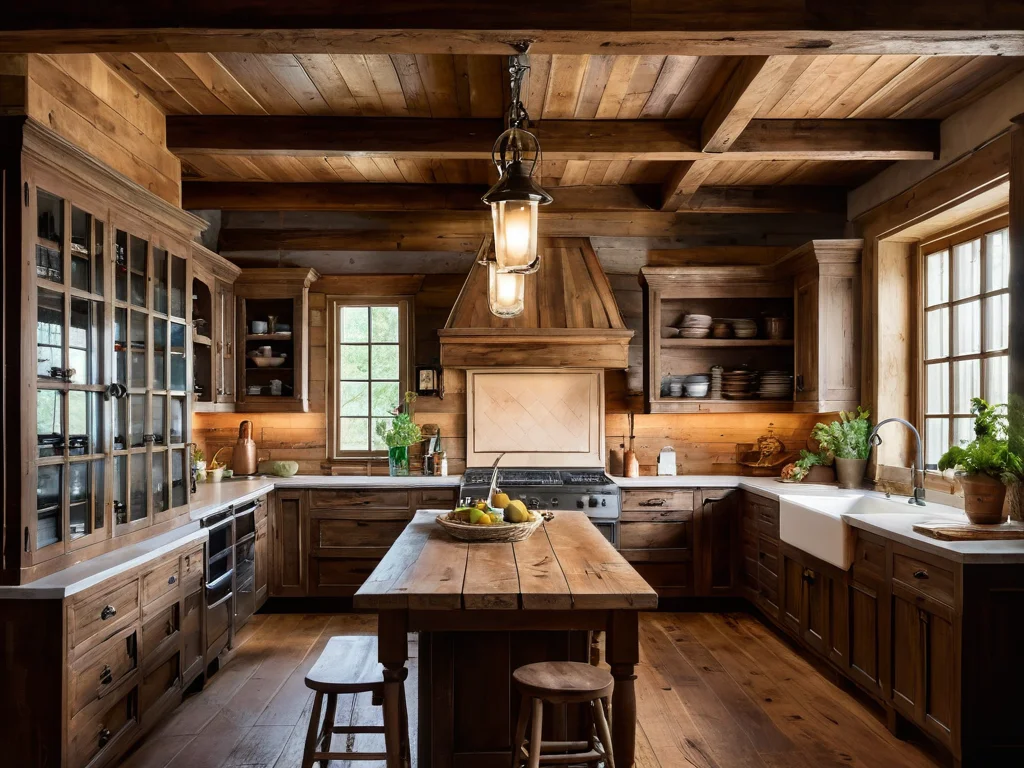
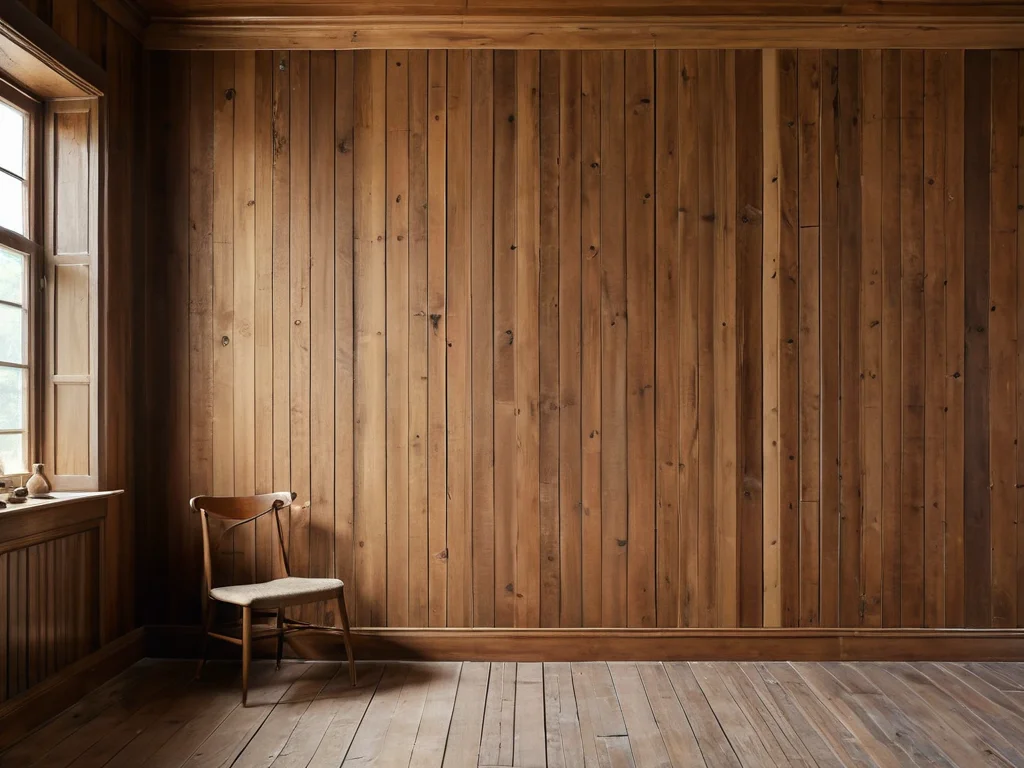
Design Projects with Wood Paneling: 10+ Ideas to Transform Your Interior
Modern design breaks stereotypes, and wood paneling is a vivid confirmation of this. Forget about boring and monotonous wooden walls that are only associated with dachas. Today, wood paneling is a flexible tool in the hands of a designer, capable of giving the interior a unique character and style.
1. Scandinavian Coziness: Whitewashed or light gray wood paneling on one or two walls in the living room or bedroom. Combined with natural fabrics, minimalist furniture, and plenty of light, it creates an atmosphere of lightness and tranquility. Use wood paneling with a minimal number of knots.
2. Chalet and Country Style: Unfinished or brushed wood paneling from pine or larch with a pronounced texture. Ideal for country houses, cafes, restaurants. It pairs well with brick, natural stone, and wrought iron elements.
3. Loft and Industrial: Wood paneling with an aged wood effect, dark shades, or painted in graphite, black, or dark gray. Looks great on accent walls, combined with concrete, metal, and exposed utilities.
4. Modern Classic: Neat euro-paneling made of ash, beech, or light oak, finished with matte varnish or oil. Can be used for wall finishing in hallways, studies, dining rooms. It is important to maintain strict lines and a restrained color scheme.
5. Children’s Room: Light-colored wood paneling made from eco-friendly wood species. Colored wood paneling can be used, or you can create appliqués from wooden elements on the wall. The main thing is the safety and naturalness of the material.
6. Accent Wall: Highlight one wall in the room, for example, behind the headboard or sofa, using wood paneling. This can be wood paneling of a contrasting color, with an interesting texture, or layout (e.g., vertical or “herringbone”).
7. Ceiling Cladding: Wood paneling on the ceiling gives the room a cozy and finished look. It looks especially impressive in combination with wooden beams or in rustic and chalet-style interiors.
8. Living Room with Fireplace: Finishing the wall with the fireplace with natural wood paneling creates a warm and welcoming atmosphere. It is best to use species with beautiful textures, such as larch or oak.
9. Kitchen and Dining Room: Wood paneling is less practical in the kitchen work area due to humidity and temperature fluctuations. However, for the dining area or backsplash (with good protection), larch paneling or specially treated wood can be an interesting solution.
10. Balcony and Loggia: An ideal place to use wood paneling, especially from coniferous species. Easy installation, pleasant appearance, and a sense of closeness to nature make the balcony a cozy place to relax.
11. Vertical Installation: Installing wood paneling vertically visually increases ceiling height, making the room more spacious.
12. Horizontal Installation: Creates a sense of width and stability, suitable for elongated rooms.
13. “Herringbone” or “Staggered” Installation: Gives the wall dynamism and a more complex, decorative look. Requires more material consumption and careful installation.
14. Combining Materials: Combining wood paneling with painted wall sections, wallpaper, decorative plaster, brick, or stone allows for the creation of unique and multifaceted interiors.
15. Brushing: Brushing (treatment with a brush) reveals the wood texture, making the surface more textured and interesting to the touch. After brushing, the wood paneling can be tinted, varnished, or waxed, emphasizing the depth of the pattern.
Don’t be afraid to experiment! Wood paneling is a versatile material that allows you to bring your boldest ideas to life and create a truly exclusive interior. The main thing is to correctly choose the species, profile, and finishing treatment.
Preparation for Installation: What You Need to Know Before Buying Wood Paneling and Fasteners?
Quality preparation is the key to successful installation and durability of your new wooden finish. Do not neglect this stage, as it determines how straight, beautiful, and securely the boards will be on the walls.
1. Material Quantity Calculation:
- Measure wall area: Determine the room perimeter and wall height, then calculate the total area (Perimeter × Height).
- Subtract window and door area: If windows and doors occupy a significant area, they can be subtracted from the total.
- Consider installation type: Overlapping installation (e.g., American siding) will require more material than euro-paneling. “Herringbone” installation will require even more.
- Add a reserve: Always include a reserve for cutting, possible defects, and future repairs – at least 10-15% of the total quantity.
- Linear meter calculation: Wood paneling is often sold by linear meter. Calculate how many linear meters you need based on the wall area and board width (Wall Area / Board Width). Don’t forget the reserve!
2. Choosing and Buying Wood Paneling:
- Wood species: As discussed, choose based on the room’s purpose and budget.
- Moisture content: Ensure the wood paneling has undergone kiln drying and has a moisture content of no more than 12-16%. The boards should not be “twisted” or have visible defects.
- Quality: It is preferable to choose class “A” or “Extra” for living spaces.
- Profile: Euro-paneling is the optimal choice for most cases.
- Purchase: Purchase the entire required volume of wood paneling from one place to avoid differences in shade and texture.
- Transportation and storage: Transport wood paneling in enclosed vehicles. Store the material horizontally in a dry, ventilated room, protected from direct sunlight, on level supports.
3. Choosing Fasteners:
Wood paneling can be fastened in various ways:
- Nails: Thin finishing nails (upholstery nails) or special wood paneling nails. Driven at an angle into the tongue or groove, they are almost invisible.
- Screws: Thin screws with fine thread, preferably with a countersunk head. Also screwed in at an angle.
- Hidden fasteners (Klyaymery): Special metal plates that are attached to the back of the wood paneling and then screwed to the battens. They ensure the neatest and most hidden installation.
- Staples (construction stapler): Suitable for fastening thin wood paneling to battens, but less reliable than klyaymery.
Important: Choose fasteners that match the thickness and type of wood paneling. For euro-paneling, klyaymery or finishing nails/screws driven at an angle are optimal.
4. Wall Preparation:
- Cleaning: Walls must be clean, dry, free of dust, grease, and old coatings (wallpaper, paint).
- Leveling: Significant irregularities should be corrected. Minor deviations (up to 0.5 cm) can be compensated for during batten installation.
- Antiseptic treatment: Be sure to treat the walls with an antiseptic, especially if they are at risk of mold or mildew (e.g., in bathrooms, on balconies).
- Vapor barrier (if necessary): In some cases, for example, when finishing damp rooms or when installing on insulation, a vapor barrier film may be required.
5. Batten Installation:
The battens are the base to which the wood paneling will be attached. They create a ventilation gap and allow for surface leveling.
- Material: Wooden battens with a cross-section of 30×30 mm, 40×40 mm, or 50×20 mm. The choice depends on the wall’s evenness and the type of wood paneling.
- Batten spacing: Usually 40-60 cm, depending on the thickness and rigidity of the wood paneling. For heavy species or when fastening with klyaymery, the spacing can be reduced.
- Fastening: Battens are attached to the wall using dowels or screws.
- Leveling: Use a level and shims (wooden or plastic) to create a perfectly flat surface. The horizontal or vertical orientation of the battens depends on the direction of wood paneling installation.
- Ventilation: Leave small gaps between the battens and the ceiling/floor for air circulation.
- Wiring: If you need to hide wiring, run it under the battens before starting the wood paneling installation.
Thorough preparation is 80% of success. Dedicate enough time and attention to this stage, and the wood paneling installation process will be much easier and more pleasant.
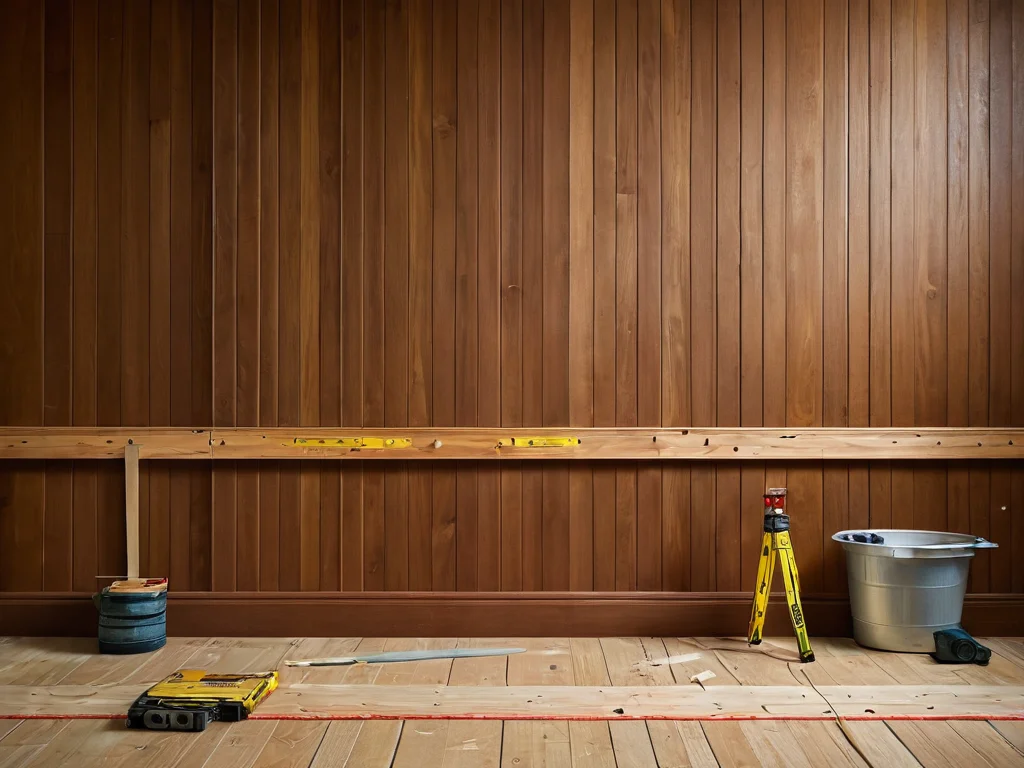
How to Finish Walls with Wood Paneling Yourself: A Step-by-Step Guide for Beginners
Installing wood paneling is a task that even a beginner can handle. The main thing is to follow the instructions, be attentive, and careful. Follow these simple steps, and you will surely be pleased with the result!
Step 1: Batten Preparation
As we’ve already discussed, battens are the foundation. Make sure they are installed straight, with the correct spacing, and all battens are securely fastened. If you plan to run wiring or install insulation, do it during the batten installation stage.
Step 2: Wood Paneling Preparation
Before starting installation, it is advisable to keep the wood paneling in the room where the finishing will be done for 2-3 days. This will allow the boards to adapt to the temperature and humidity. Inspect each board, rejecting defective ones.
Step 3: Starting Installation (Example: Installing Euro-paneling from Left to Right)
- First board: Start from a corner. Install the first board strictly vertically (or horizontally, depending on your design). The tongue of this board should face the next board. If starting from a corner, the tongue of the first board can be carefully cut off to ensure a tighter joint.
- Fastening the first board: Fasten the first board to the battens. Use hidden fasteners (klyaymery) or finishing nails/screws, driving them at an angle into the lower part of the groove. Try to fasten as discreetly as possible.
- Subsequent boards: Insert the groove of the next board into the tongue of the already installed one. Ensure the connection is tight, without gaps.
- Fastening: Fasten the second board similarly to the first, using klyaymery or nails/screws in the tongue.
- Continue installation: Repeat the process, inserting each subsequent board into the previous one. It is important to monitor the verticality (or horizontality) of the installation using a level.
- Cutting: When reaching the opposite corner or the corner of a window/door, the last board will likely need to be cut to width. Use a miter saw or handsaw for a straight cut.
Step 4: Finishing Corners and Joints
- External corners: Corners can be finished with special wooden corner pieces, which are attached with screws or glue.
- Internal corners: The board that abuts an internal corner can be cut at a 45-degree angle (if the profile allows) or simply pressed tightly against the wall. The gap can be hidden with a decorative trim.
- Joining boards lengthwise: If one board is not long enough, use the “staggered” or “half-lap” method, where the ends of two boards are cut and joined. This joint is best placed on a batten.
Step 5: Finishing Treatment (briefly, more details below)
After completing the installation, the wood paneling needs to be protected and decorated. This stage includes sanding, applying antiseptics, stains, varnishes, waxes, or paints.
Tips for Beginners:
- Work in pairs: If possible, ask someone to help. Working together is faster and easier, especially when fitting long boards.
- Use a square: When laying, check the perpendicularity of each board.
- Don’t rush: Accuracy is the main rule. It’s better to spend extra time than to redo it later.
- Test board: Before starting installation on the wall, try installing a few boards in a small area to understand the fastening principle and choose the optimal angle for driving nails or screws.
- Eye and hand protection: Use safety glasses and gloves, especially when working with a saw and hammer.
By following these steps, you can independently and qualitatively finish your walls with wood paneling, giving your home special coziness and a unique style.
Treating and Painting Wood Paneling: Secrets of Durability and Beauty
To ensure your wood paneling lasts for many years, maintaining its attractive appearance and protecting it from external influences, it must be properly treated. This stage is no less important than the installation itself and requires special attention.
1. Sanding:
- Why it’s needed: Sanding removes minor imperfections, burrs, and dust residues after manufacturing or installation. It prepares the surface for even application of protective and decorative compounds.
- Tools: You can use a sanding machine (belt, orbital, eccentric) or sandpaper (medium and fine grit).
- Technology: Sand along the wood grain. If brushing has been done, sand carefully to avoid smoothing the relief. After sanding, be sure to remove dust from the surface with a brush or vacuum cleaner.
2. Antiseptic Treatment:
- Purpose: Antiseptic treatment protects the wood from rot, mold, mildew, and pests. This is especially important for rooms with high humidity (bathrooms, kitchens, balconies) or for wood paneling that will be in contact with the ground (e.g., when finishing a foundation).
- Types of antiseptics: They can be water-based, solvent-based, or have a preservative effect. For living spaces, it is better to choose odorless water-based compounds.
- Application: Apply the antiseptic with a brush or sprayer in 1-2 coats. Before applying the next coat, let the previous one dry according to the manufacturer’s instructions.
3. Tinting (Stain, Dye):
- Effect: Stain (or dye) penetrates the wood, giving it the desired shade while keeping the natural wood texture visible. You can choose any color – from natural shades of oak, walnut, pine to exotic colors.
- Application: Apply with a brush, sponge, or cloth; remove excess with a rag. For a deeper color, apply in several coats.
- Important: Before tinting, test the stain on a small, inconspicuous area of the wood paneling to ensure you are satisfied with the result.
4. Protective Coating:
This is the final stage that protects the tinted or natural wood layer from moisture, mechanical damage, abrasion, and UV rays.
- Varnishes: They can be water-based, acrylic, polyurethane, or alkyd. Acrylic and water-based are considered the most eco-friendly and fast-drying. Varnishes create a durable film on the surface. Choose a varnish with the desired gloss level – matte, semi-matte, or glossy.
- Oils and waxes: They penetrate deep into the wood, preserving its “breathing” properties and natural texture. They give the surface a pleasant velvety look. They require more frequent renewal than varnishes, but they are easier to restore.
- Paints: Allow you to completely change the color of the wood paneling, covering the wood texture. Acrylic and alkyd paints are suitable for wood paneling.
Application technology for protective coatings:
- Number of coats: Usually 2-3 coats of protective coating are applied.
- Intercoat drying: Allow each coat to dry completely before applying the next, according to the manufacturer’s instructions.
- Intercoat sanding: After the first coat dries (especially when using varnishes), light sanding with fine sandpaper (240-320 grit) is recommended to remove raised fibers and create a perfectly smooth surface.
- Tool: Brush, roller, or spray gun. The choice depends on the type of coating and your preferences.
Secrets of the Craft:
- Work in a well-ventilated room: Ensure fresh air circulation, especially when using scented compounds.
- Protect surfaces: Cover the floor and adjacent areas with film or newspapers.
- Test: Always try the compounds on a small piece of wood paneling.
- Uniformity: Try to apply the coating evenly, without drips or missed spots.
- Tool quality: Use high-quality brushes and rollers to avoid lint on the coating.
- Brushing: If you want to emphasize the wood texture, brush (clean with a brush) before tinting and varnishing.
Properly selected and expertly applied treatment will not only extend the life of your wood paneling but also allow you to achieve the exact effect you intended, turning ordinary wooden finishing into a true work of art.
Typical Mistakes When Working with Wood Paneling: How Not to Ruin Your Renovation?
Even the most experienced craftsman can make a mistake, let alone a beginner. To ensure your wood paneling renovation goes smoothly and the result is pleasing to the eye, let’s look at the most common mistakes and learn how to avoid them.
- Incorrect wood paneling selection:
- Species selection: Using wood paneling from soft species (pine, spruce) in high-traffic areas or areas prone to mechanical damage.
- Quality: Buying low-grade wood paneling (“C” or “B”) for elite finishes, which will inevitably lead to knots, cracks, and an overall untidy appearance.
- Moisture content: Ignoring wood moisture content. Buying wood paneling that has been improperly dried or stored in damp conditions will lead to its deformation (twisting, cracking) after installation.
- Violation of installation technology:
- Absence or incorrect battens: Installing wood paneling directly on the wall without battens, especially if the wall is uneven. This will lead to crooked sheathing.
- Incorrect batten spacing: Too wide spacing can lead to sagging of the wood paneling, especially when using thin boards.
- Ignoring gaps: Lack of expansion gaps at the walls (approximately 1 cm), which can lead to deformation of the sheathing due to changes in humidity and temperature.
- Fastening: Driving nails/screws too deep or, conversely, not deep enough. Overtightening klyaymery, which can deform the groove.
- Ignoring the level: Fastening boards without constant control of verticality/horizontality, leading to “wobbly” sheathing.
- Careless joints: Sloppy joints at corners, along length, where gaps are visible or, conversely, too tight, breaking the joint geometry.
- Errors in treatment:
- Absence of sanding: Applying finishing compounds (varnishes, paints) to an unsanded surface, leading to uneven application, bare spots, and poor adhesion.
- Ignoring antiseptic: Insufficient protection of wood from moisture, mold, and pests, especially in “wet” areas.
- Incorrect selection of compounds: Using compounds not intended for wood, or incompatible with each other.
- Violation of application technology: Applying coatings in unsuitable conditions (too humid, cold), ignoring intercoat drying and sanding, leading to drips, bubbles, and clouding of the coating.
- Incorrect tinting: Achieving an uneven shade due to unprofessional stain application or the use of low-quality compounds.
- Forgot about the ends: Untreated board ends (especially at joints) are “cold bridges” and potential points of moisture ingress.
- Style and design mistakes:
- Overcrowding: Finishing all walls and the ceiling with wood paneling in a small room, especially in dark tones, can make it feel “oppressive” and gloomy.
- Inconsistency with style: Using massive, rough wood paneling in a modern minimalist interior, or vice versa, smooth, varnished – in a brutal loft.
- Color solutions: Poor choice of stain or paint color that clashes with the rest of the interior.
- Incorrect wood paneling selection:
How to avoid mistakes:
- Study the information: Read our article, watch tutorial videos, consult with specialists.
- Start small: Try finishing a small room (e.g., a balcony) or one accent wall first.
- Don’t skimp on materials: Quality wood paneling and good paints/varnishes are the key to durability and aesthetics.
- Follow the technology: Carefully read the manufacturer’s instructions and follow them.
- Use a level and square: Constantly monitor the straightness of the installation.
- Protect your eyes and hands: Work with personal protective equipment.
- Test: Try different treatment options on samples before applying to the entire surface.
Remember that accuracy, attention to detail, and adherence to technology are your main allies in wood paneling renovation. By avoiding these common mistakes, you can achieve an excellent result!
Wood Paneling vs. Other Materials: When to Choose Wood, and When Not To?
Wood paneling is a material with a rich history and many advantages, but like any other finishing material, it has its strengths and weaknesses, as well as competitors. Let’s compare wood paneling with popular alternatives to understand when it will be the optimal choice.
Wood Paneling vs. Drywall:
- Drywall:
- Pros: Smooth surface, easy installation, possibility of creating complex structures (multi-level ceilings, niches), non-combustibility, low cost.
- Cons: Requires finishing (putty, painting, wallpaper), afraid of moisture (except for moisture-resistant type), less eco-friendly than wood, fragile.
- When to choose drywall: If you need a perfectly smooth surface for subsequent painting or wallpapering, if you plan to create complex shapes, if non-combustibility is important.
- When to choose wood paneling: If you value naturalness, eco-friendliness, unique wood texture, coziness, and warmth that only natural wood can provide. Wood paneling does not require complex finishing; it is a decorative element in itself.
- Drywall:
Wood Paneling vs. Plastic Panels (PVC):
- Plastic panels:
- Pros: Absolute moisture resistance, ease of care, simple installation, low cost, variety of colors and textures (imitating wood, stone).
- Cons: Not eco-friendly (can release harmful substances when heated), low resistance to mechanical damage (easily dented, scratched), not as “warm” and cozy as wood, can deform with temperature fluctuations.
- When to choose plastic panels: For finishing very humid rooms (swimming pools, showers), utility rooms, balconies (where moisture resistance and ease of care are important), and also with a very limited budget.
- When to choose wood paneling: For living rooms, bedrooms, children’s rooms, living rooms, where eco-friendliness, aesthetics of natural wood, and creating a cozy atmosphere are important. Larch or aspen paneling can also be used in bathrooms.
- Plastic panels:
Wood Paneling vs. Wallpaper:
- Wallpaper:
- Pros: Huge selection of designs, textures, colors, relatively simple installation, ability to easily change the atmosphere.
- Cons: Not durable (especially paper ones), afraid of moisture and mechanical damage, can fade in the sun, requires perfectly smooth wall surfaces.
- When to choose wallpaper: If you like to change your interior often, want to create a bright accent, use complex prints or textures that are difficult to imitate with wood.
- When to choose wood paneling: If you are looking for a durable, eco-friendly solution, want to give the interior natural warmth and coziness, create an accent wall, or finish the entire room in a suitable style (Scandinavian, rustic, chalet).
- Wallpaper:
Wood Paneling vs. Decorative Plaster:
- Decorative plaster:
- Pros: Creation of unique textures and effects (velvet, stone, concrete), high strength, durability, moisture resistance.
- Cons: Requires a perfectly prepared surface, complex and expensive installation, difficulty of dismantling and redoing.
- When to choose decorative plaster: For creating modern, textured surfaces, imitating natural materials (stone, concrete), in loft, high-tech, minimalist interiors.
- When to choose wood paneling: If you want to preserve the warmth and natural beauty of wood, if a simpler and faster installation is needed, if eco-friendliness and the specific texture of natural wood are important.
- Decorative plaster:
When wood paneling is definitely the best choice:
- Creating atmosphere: If your goal is to create an atmosphere of coziness, warmth, and natural harmony in your home.
- Eco-friendliness: If natural, health-safe materials are your priority.
- Styles: For interiors in chalet, rustic, country, Scandinavian, Provence styles, as well as an accent material in modern styles.
- Masking defects: If the walls have irregularities that are difficult or expensive to level.
- Improving acoustics: Wood has good acoustic properties, absorbing excess echo.
When to consider alternatives:
- Budget: If the budget is very limited, perhaps cheaper materials (plastic, inexpensive wallpaper) will be a more reasonable choice.
- Modern styles: In ultra-modern styles (minimalism, high-tech), wood paneling may look out of place, unless used as a very dosed accent.
- Wet rooms: For shower cabins or areas of direct contact with water, tiles, plastic, or special moisture-resistant panels are better suited.
- Frequent design changes: If you like to change your interior often, wallpaper or paint will be a more practical solution.
By weighing all the pros and cons, you can make an informed choice and select the ideal material for your walls that will please you for many years to come.

Рекомендуем:
 Internal Wall Insulation: Materials and Technology
 PVC Wall Panels: Cheap and Cheerful. Installation Guide
 MDF Panel Wall Finishing: Installation Guide
 DIY Decorative Stone Wall Installation: Your Guide to Home Transformation
 Washable wallpaper for the kitchen: why it’s the best idea for your renovation?
 Bathroom: Tile or Paint. What Will Everyone Face?
 How to Update Old Tiles Without Removing Them: 99 Ways to Transform Your Bathroom and Kitchen
 How to Make a Brick Wall in an Interior (Imitation)
 What to do if mold or mildew appears on the walls?
 Joint filler for tiles: how to choose the color and apply it correctly
Grout for tiles: how to choose the color and apply it correctly
Joint filler for tiles: how to choose the color and apply it correctly
Grout for tiles: how to choose the color and apply it correctly
 How to Tile Walls in a Bathroom: A Detailed Guide
Revêtement mural en panneaux MDF : guide d’installation
How to Tile Walls in a Bathroom: A Detailed Guide
Revêtement mural en panneaux MDF : guide d’installation
 Revêtement mural en lambris : guide étape par étape
Panneaux PVC pour murs : bon marché et efficace. Guide d’installation
Comment rénover du vieux carrelage sans le retirer : 99 façons de transformer votre salle de bain et votre cuisine
Pose de pierre décorative sur le mur par vous-même : votre guide pour transformer votre maison
Papier peint lavable pour la cuisine : pourquoi est-ce la meilleure idée pour votre rénovation ?
Comment réaliser un mur en briques dans un intérieur (imitation)
Revestimiento de paredes con machihembrado: guía paso a paso
Revêtement mural en lambris : guide étape par étape
Panneaux PVC pour murs : bon marché et efficace. Guide d’installation
Comment rénover du vieux carrelage sans le retirer : 99 façons de transformer votre salle de bain et votre cuisine
Pose de pierre décorative sur le mur par vous-même : votre guide pour transformer votre maison
Papier peint lavable pour la cuisine : pourquoi est-ce la meilleure idée pour votre rénovation ?
Comment réaliser un mur en briques dans un intérieur (imitation)
Revestimiento de paredes con machihembrado: guía paso a paso